
Get in touch
If you need help setting up an account or making a phone call, or would like to leave feedback on the site or service, please don't hesitate to let us know.
Contact usIf you have a technical issue, for example you can not place calls or you need help setting up your incoming number/VoIP device, then please click on the following link to set up an email to the technical department Email us
Configure the Nokia E61 Mobile Phone
The Nokia E61 is a VoIP-capable mobile phone which lets you place calls using Localphone’s VoIP services. This guide describes how to configure the device to work with your Localphone account.
You can find you SIP registration details under the VoIP section of your Localphone Dashboard.
Navigate to the SIP Settings Page
In the menu, follow the links to “Settings” > “Connection” > “SIP settings”.

Create a New SIP Profile
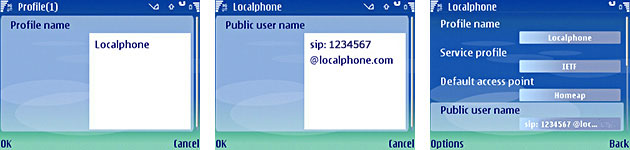
Bring up the “Options” menu and select “Add new” > “Use default profile”. On the resulting screen set the preferences below and select a “Default access point”.
Setting: Value
Profile name: Localphone
Public user name sip: [SIP ID]@localphone.com
Configure the Proxy Server Settings
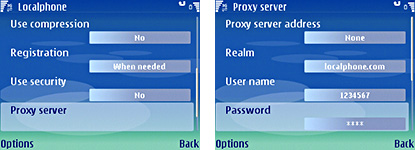
Follow the link to the “Proxy server” section, and set the “Realm”, “User name” and “Password” as follows, leaving any other fields blank or as their default value:
Setting: Value
Realm: localphone.com
User name: [SIP ID]
Password: [SIP Password]
Configure the Registrar Server Settings
Return to the main menu for your profile and select “Registrar server”. Set the “Registrar Server Address”, “Realm”, “User name” and “Password” as follows (leaving any other fields blank or as their default value):
Setting: Value
Registrar Server Address sip:localphone.com
Realm: localphone.com
User name: [SIP ID]
Password: [SIP Password]
For some models (including the Nokia E65), you must use “proxy.localphone.com” for the Registrar Server Address instead. Please try this if you encounter problems registering with the settings above.

Configure the Internet Telephony Settings
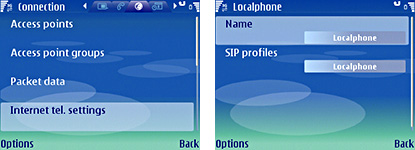
Go back to the “Connection” settings page and select “Internet tel. settings”.
Select “New profile” from the options menu, and choose the “Public user name” you set in step #2 (sip:[SIP ID]@localphone.com) from the “Select SIP URI” list.
Change the default profile “Name” to something more meaningful.
Following the steps above, you should now be able to connect to Localphone and make and receive calls. For further information about configuring the Nokia E61, or for help with troubleshooting, please see:
This guide is provided for assistance. If you discover any errors in this page, please send us your comments and we will update the guide as soon as possible.